BODY: a full-spectrum converted camera
Starting out in infrared photography is easier than you might think. In fact, if you’ve got a basic Point & Shoot camera lying around, you can already begin experimenting. Sure, having a camera with better resolution, more megapixels, dynamic range, and custom white balance options is great — but those are bonuses. The most important thing is simple: have a camera.
Converting a DSLR or mirrorless for IR usually costs at least €150, but converting a Point & Shoot at home is a doable DIY project. There are numerous tutorials available online, and it’s a great way to dip your toes into the world of IR without incurring significant costs.
At this point, I highly suggest your conversion includes an Anti Reflective (AR) Clear Glass as a substitution of the original Hot Mirror. The AR should be antirreflective in both, ViS and NIR (from 400nm to 1100nm).
Alternatively, if you live in Europe, I can help you get your first camera. Just send an email if you need any help.
Use Two Camera Bodies
Personally, I always recommend having two camera bodies: one for normal visible light (ViS), and one converted to Full Spectrum. I use a second body alongside my main camera for regular photography. In my case, I use two Fuji X-Trans IV bodies. Some photographers go big using a full-frame — or even medium format cameras like the Fuji GFX for IR — but again, it’s all about what works for your budget.
One tip: never convert your main camera.
It’s just not worth the hassle. You’d need to buy hot mirror filters for every lens you use, or get a clip-in hot mirror, which can be costly; sometimes it cannot even fit some of the original lenses. And aftermarket hot mirrors rarely give you the same clean color output as the original manufacturer ones (OEM). If you enjoy shooting in visible light, keep your main gear intact and look for a cheaper body from the same brand — that way, you can still use all your lenses.
Extra Tip: Travel light and Simplify your workflow
I would strongly recommend you to read my article about “How to do Travel Photography for IR Photographers”.
Lenses: choose wisely
At this point, if you have a second body, you probably have some lenses. Choosing wisely which lenses you will use for IR is fundamental. There are many problems some lenses might face when shooting IR light. Think that your lenses are not thought to be used under IR conditions — their coatings, internal reflections, and optical formula are optimised for visible light, not for infrared wavelengths.
At this point, if you have a second body, you probably have some lenses. Choosing wisely which lenses you will use for IR is fundamental. There are many problems some lenses might face when shooting IR light. Remember, most lenses aren’t designed to work under infrared conditions — their coatings, internal reflections, and optical formulas are optimized for visible light, not IR wavelengths.
The main issues to watch out for are:
- Hot spots (bright or dark areas in the centre of the image)
- Reduced overall sharpness
- Focusing inaccuracies (IR light focuses differently than visible light)
- Loss of edge detail and sharpness
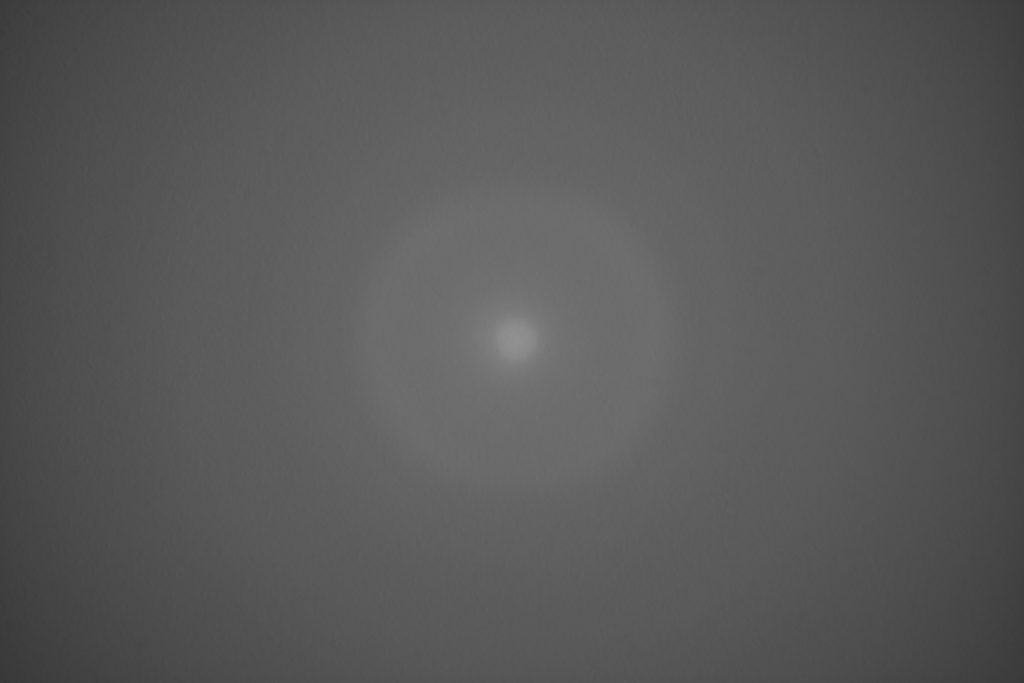
The Hot Spot Problem
Some lenses produce a hot spot when shooting IR: a bright circle or dark patch in the centre of the image. Sadly, that means your favourite lens might be unusable for IR photography.
So, before investing too much, check if your lenses are IR-compatible. You’ll find online lists and tests for many models. If you’re building up from a tight budget, go with affordable manual lenses from brands like TTArtisan, 7Artisans, or Meike — some of them are IR-friendly and won’t break the bank. As you get deeper into IR, you can slowly build your dream kit.
Prime lenses tend to be more IR-friendly than zoom lenses, although this is just a generalisation.
Focusing and Sharpness
From my own experience, focusing is usually not a major issue — as long as the conversion has been done properly. However, what can be problematic is edge sharpness. Infrared wavelengths often introduce softness at the image borders (blurriness) or other unwanted effects. Some lenses also tend to produce color fringing (chromatic-like aberrations) more easily than others, and this isn’t always related to the price or build quality of the lens.
Because of these variables, a bit of trial and error is inevitable. Every lens behaves differently under IR light, so it’s important to test which ones work best with your specific setup.
Filters: The Heart of IR Photography
This is where the magic happens: the filters.
And yes, I absolutely recommend the True Color IR filters. Some are easier to use than others, but they all share one big advantage: they save you time; no need to spend hours in post-processing, swapping color channels or applying complex edits. With True Color IR, you get balanced, visually pleasing tones straight out of the camera (SOOC). Plus, most have a lesser chance of producing a hotspot due to working with both ViS and a small fraction of IR.
For black-and-white IR artworks, I also suggest:
- 720nm: softer contrast and some color with white vegetation.
- 780nm: higher contrast, darker skies, white vegetation.
- 850nm: theoretically, it produces very dramatic skies, but honestly quite similar to 780nm. Since 780 lets in more light, it’s more flexible in low-light situations — although IR photography isn’t usually done in low light anyway.
Bonus Accessories I Always Carry
A few extra tools that make IR shooting smoother:
- White and grey cards for proper white balance.
- A filter pouch — I use a small one for 2–3 filters when I travel light, and a larger one when I want more options.
- Step-up rings so I can use the same filter on different lens sizes.
Final Thoughts
Infrared photography opens up a new way of seeing the world — with trees that glow, skies that darken, and colors that surprise. You don’t need a fancy setup to begin. Just don’t convert your main camera, choose your gear wisely, and be ready to experiment.
And if you ever need help picking your first filter or converted camera, feel free to reach out — I’m happy to help you get started.